

Caulk is a very common tool across different home improvement projects. It bridges gaps where different materials meet—whether you’re sealing around your tub, sealing your windows in the wintertime, or hiding unsightly cracks in your crown molding.
Using caulk properly can help you keep water and outside air where they belong, stop mold and rot from forming where you can’t reach them, save on energy bills, improve your home’s appearance, and protect your paint job.
Today’s high-tech caulks are very durable, but they won’t last forever. When caulk fails, you’ll need to repair the joints as soon as possible to avoid damaging your home.
If you’re looking for the best caulk for air sealing, we encourage you to explore our comprehensive article about the top caulk choices for air sealing in your home.
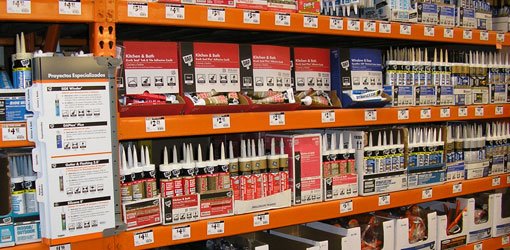
Types of Caulk
There are many specialized caulks on the market, but these are the most common types homeowners use:
Acrylic Latex
These caulks are best for general-purpose use, such as sealing around windows, doors, and moldings. They aren’t as flexible as other varieties, but they’re easy to apply and clean up with soap and water. You can use them indoors and out so long as the curing temperature is at least 40º F. They’re paintable, though you can find them in a variety of different colors if you choose the right supplier. They’re water- and mildew-resistant, but they need to dry thoroughly before getting wet.
Butyl Rubber
Butyl rubber caulks are highly water-resistant and work well to seal concrete, brick, and metal surfaces. You can paint over them when they’re completely cured, and they stay flexible to accommodate expanding and contracting gutters and roof flashing. However, they’re messy to use, and you’ll need to use solvents to clean them up.
Silicone
Silicone caulks excel at sealing glass, metal, ceramic tile, and other non-porous surfaces. While most brands of silicone caulk aren’t paintable, you can find them in clear and several colors. They can go on at almost any temperature and stay flexible after curing, though they have a sharp odor early on.
There are a few caveats to using silicone caulk. It doesn’t work well on porous materials like wood and masonry. Since nothing sticks to cured silicone, including other silicone, it’s hard to repair and leaves behind an annoying film you’ll have to clean with solvents.
Kitchen and Bath
Kitchen and bath caulks are specially formulated for areas subject to high moisture. They come in a variety of colors that complement backsplashes and plumbing fixtures, and clean up easily with soap and water. However, they need to fully cure before getting wet.
Caulking Considerations
The caulk aisle is full of different brands and varieties. Consider these factors when choosing the right one for your job. The wrong product may not seal as effectively or last as long as you want.
Materials
Different caulk materials are better for different projects. Silicone products are best for non-porous surfaces such as glass and metal. They’re good at providing a watertight seal where you need increased durability against moisture. Acrylic latex caulks are better for porous materials like wood and masonry, and they’re flexible enough to let the building materials breathe.
Moisture Exposure
Tubs, showers, and sinks are constantly subject to moisture, making your caulk choice even more critical. Use a product that’s both water-resistant and adept at preventing mildew.
Kitchen and bath caulks often contain antifungal additives that inhibit mold growth, providing an added layer of defense. This makes them ideal for high-moisture environments.
Location and Temperature
Different caulks react differently to extreme temperatures and temperature fluctuations. Some caulks can only be applied in warm weather, while others aren’t designed to handle extreme changes in temperature.
Choose exterior caulk when you need a tight seal through grueling heat, changing seasons, and wet weather. Interior caulk is usually easier to apply and clean up, and it smells less. However, it won’t be as strong as an exterior formula.
Paintability
If you’re using caulk on visible joints, keep visual continuity in mind. You can paint over most caulks after they cure, but some types lack that capability. If your project requires a seamless color integration with walls and trim, check the product label to make sure the caulk you’re thinking about buying is paintable.
Application and Cleanup
If you’re new to caulking or working on a large-scale project, you’ll probably want a sealant that’s easy to apply. Acrylic latex fits the bill—it washes out with water and is straightforward to tool. Solvent-based caulks are highly effective, but they’re harder to apply. You may also need to use solvents or mineral spirits to clean up mistakes.
Most caulk comes in tubes that require a caulking gun. However, you can also find varieties in squeeze tubes for small projects and pressurized cans for large gaps around doors and windows.
Caulking guns consist of a cradle to hold the tube, a plunger to push caulk out, and a trigger that controls the flow. You can buy a cheap model for a few dollars or a battery-powered, push-button one for more money.
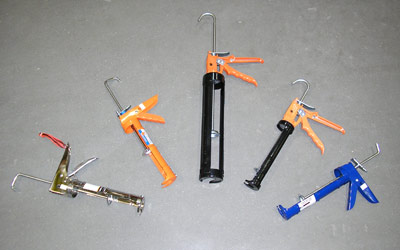
For most projects, we recommend a gun in the $10 to $30 price range. These models have a number of features and improvements such as:
- Dripless systems: With a basic caulking gun, you have to disengage the plunger to stop the flow. A dripless model can stop the flow when you let go of the trigger.
- Cutter: A cutter can help you trim the tube nozzle to the size of the bead you want to apply.
- Seal punch: After you trim the nozzle down, a punch tool can puncture the aluminum seal inside the tube.
- High ratio: A good caulking gun should have more thrust in the plunger—this way, your hand won’t get tired as easily.
Applying Caulk
Be sure to use only fresh caulk. When in doubt squeeze a little out and let it dry overnight to see if it hardens properly. Caulking is an acquired skill that takes a bit of practice to master, so practice on scrap until you get the hang of it.

Start by cutting the nozzle at a 45 degree angle equal in width to the gap you plan to fill. Cutting too wide a hole not only wastes caulk but makes the bead more noticeable and harder to smooth out.
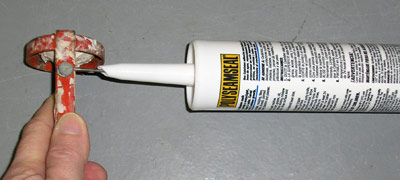
Puncture the seal on the tube using the punch on the caulking gun or a nail.
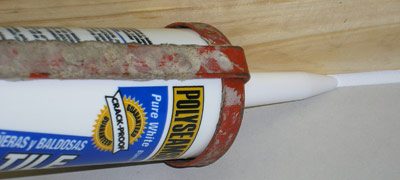
Place the tube in the gun and push the plunger up snug. Squeeze the trigger until caulk starts to come out of the nozzle. Put the nozzle in the gap and pull the gun slowly toward you at a 45 degree angle while pushing the trigger. The bead should contact both sides of the joint and fill the gap.

Use a clean wet finger, damp rag, or special caulk smoothing tool to even out the bead before it skims over.
Today’s Homeowner Tips
Wear disposable gloves to keep your hands clean when using silicone and other solvent based caulks.
To make a straight line, use strips of painter’s tape on each side of the gap. After applying the caulk and smoothing it out, peel off the tape.


Leave a Reply